
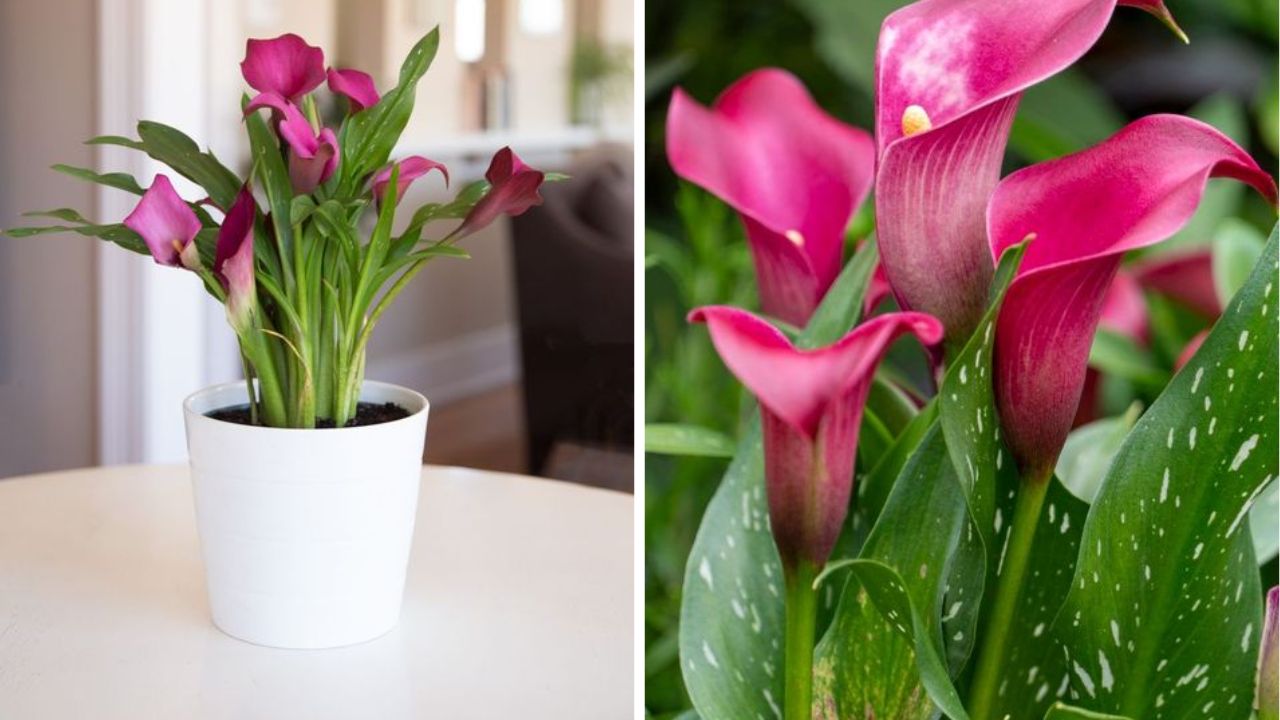
Calla lilies are elegantly designed flowers that are in high demand for exquisite home gardens and bouquets for special occasions. White, light pink and deep burgundy are among the colors of the blossoms; more recently, hybrids in striking hues like brilliant orange and black have been observed. They are popular for wedding floral arrangements because they are long-lasting cut flowers.
Plant calla lilies in the spring to encourage growth. They develop at a slow pace, often bearing flowers by early to midsummer and continuing to bloom all summer long until early October. Calla lilies are native to Africa and thrive in warm regions. However, they can occasionally become invasive, particularly in Australia and California.
Note: Both people and pets are poisoned by calla lilies. The plant is poisonous in every aspect.
Calla Lily Plant Overview

| Common Name | Calla lily, arum lily |
| Botanical Name | Zantedeschia aethiopica |
| Family | Araceae |
| Plant Type | Rhizome |
| Mature Size | 2–3 ft. tall, 1–2 ft. wide |
| Sun Exposure | Full, partial |
| Soil Type | Moist but well-drained |
| Soil pH | Acidic |
| Bloom Time | Summer |
| Flower Color | White, pink, coral, maroon, orange, yellow |
| Hardiness Zones | 8 to 10 |
| Native Areas | Africa (South Africa, Swaziland) |
| Toxicity | Toxic to humans, toxic to pets |
Calla Lily Care

USDA hardiness zones 8 through 10 are suitable for the easy outdoor growth of calla lilies, which are tropical plants. Though they may die back in the summer and reappear every year, calla lilies should be planted as annuals in cooler climates. To maintain the health of this plant, recreate the warmth, light, and moisture of its native habitat.
One of the main signs that they are not real lilies is that they grow from a rhizome rather than a bulb. Fertilizer promotes flower growth, just like it does for other flowering plants.
Light Requirements
In keeping with their tropical origins, calla lilies prefer warm temperatures and lots of light. If your summertime temperatures are high and muggy, your calla lilies may thrive in a somewhat shaded area. You can leave your calla lilies in full sun if your summers are milder.
Soil and Potting

For optimal results, calla lilies should be planted in rich, wet, well-drained soil. Calla lilies are happy to thrive in damp soil and frequently do well next to ponds. However, keep in mind that too much watering could cause root rot in these plants. Before planting your flowers, enrich the soil with organic matter to boost its nutritional density.
Watering
You can water the plants once a week once the rhizomes are established, or more frequently if there is extreme heat or a drought. Potted calla lily plants indoors require continuous hydration because containers dry out faster than ground plantings.
Temperature and Environment
Temperatures between sixty and eighty degrees Fahrenheit are ideal for calla lilies. Additionally, they tolerate a fair amount of wetness and humidity, thus humid summers are ideal for the blooms’ blossoming. Upon falling below fifty degrees Fahrenheit, plants go into dormancy. Prepare your rhizomes for winter by digging them up before the weather turns cold. The plant may die from frost.
Fertilization
To encourage abundant flowering, calla lilies require feeding both at the time of planting and each spring at the start of the growing season. The majority of balanced fertilizers will function perfectly. A combination high in nitrogen should be avoided as it may cause the plant to blossom less frequently.
Types of Calla Lily
Flowers of the common calla lily are white with a yellow spadix. Zantedeschia aethiopica is the botanical name for these, which is frequently listed. They are both the biggest and the hardest calla lilies. This plant has been transformed into cultivars that are slightly smaller in stature and come in a variety of colors.
Zantedeschia ‘Edge of Night’: The blossoms on this plant have a color similar to black velvet, ranging from dark purple to black.
Zantedeschia ‘Red Alert’: Bright orange and red flowers of this cultivar emerge from May to August.
Zantedeschia ‘Picasso’: Has purple-throated white blooms.
Zantedeschia ‘Sunshine’: Features cheerful, bright yellow flowers
Pruning

Regular trimming is not necessary for calla lilies, but you can remove any wilted bloom parts. This plant is not poisonous if sections of it are removed. Using sterile pruning shears or your fingertips, pinch stems right below the flower’s base. When it dies back at the end of the growing season, if you reside in a zone 8 or warmer, cut it down to the soil’s surface and discard any remaining plant material. It will come again in the spring. (To prevent contacting the sap, it is advised to wear gloves when working with this plant.)
Propagating Calla Lily
The plant can be multiplied by producing calla lilies from seeds or by splitting the rhizome or root system. You can split up the huge clumps of calla lilies into individual plants. Rhizome-grown plants will blossom significantly earlier than seed-grown ones. To propagate a calla lily, split the rhizome as follows:
- To lift the rhizome of your calla lily if it is in the ground, you will need a shovel or pitchfork. You will need potting soil and a clean pot if you intend to keep the plant warm indoors.
- To make the root simpler to pull up, carve a circle around it with the shovel or pitchfork.
- After removing the clumped root, clean the rhizome by brushing off any debris and store it for a few days in a well-ventilated, shaded spot. Never water or moisten it.
- After it dries, cut the rhizomes apart with a sharp knife. Although they don’t have to split precisely where they join, each rhizome segment should have at least one eye or root emerging from it.
- Plant the rhizome again in a garden bed supplemented with compost, keeping it at least six inches apart from other plants, or transplant it into a pot with soil that drains well and is wet. An alternative is to store the rhizomes for the winter.
How to Grow Calla Lily From Seed?
A calla lily sown from seed might take up to three years to blossom. Pre-growing calla lily seeds is necessary, and this can be accomplished by laying the seeds out on a moist paper towel and covering them. The paper towel should be kept in a cold place, like a cellar or basement. Check for growth after a few days. If any do not exhibit any indications of life, discard them.
Plant the seed in a well-draining pot with premium soilless media. Keep the soil damp and keep an eye out for growth. After observing the plants for a few weeks, take the weakest branch out of each pot. Each pot should only contain one seedling.
Potting and Repotting Calla Lily
When the roots of your calla lilies appear congested, it’s a sign that they need to be in a larger container. Replant calla lily plants if you see a problem with their roots because they will not grow well if they are root-bound. Purchase a pot that is broader and deeper than the previous one by at least two or three inches.
Repotting calla lilies involves carefully lifting the blooms from their smaller pot and transferring them into the larger one, being cautious not to squander the fragile roots. Load the new pot full of dirt. After repotting, keep the soil constantly moist for a few days. Verify that the ground is not wet or damp.
Since terracotta pots are porous and enable water and air to travel through their walls, they are an excellent choice for this plant since they help prevent overwatering, which in turn promotes healthy plant growth. Clay pots have the drawback that the soil dries out more quickly, necessitating more regular watering.
Overwintering
You can purchase fresh rhizomes every growing season or dig up and store the rhizomes if you reside in a USDA hardiness zone that is colder than 8. After a rhizome has been dug up, carefully brush off any leftover soil. Washing or watering the calla lily rhizomes might lead to fungal root rot, therefore avoid doing so.
Trim the tops of the rhizomes of any foliage. For four to seven days, let the rhizomes dry in a warm, dry, and well-ventilated area. This is crucial for winter calla lily maintenance because it enables the rhizome’s outer skin to harden or cure.
The calla lily rhizomes can be wrapped individually in newspaper or put in a paper bag once they have dried. Keep them somewhere that stays between 50 and 60 degrees Fahrenheit that is dry and cool. A garage or basement typically works well.
Common Pests and Diseases
Growing calla lilies can present a number of challenges, chief among them being bacterial soft rot, which damages the rhizomes, and botrytis, a fungal disease that results in the development of a filmy gray mold on the petals, stems, and leaves of the plant. Don’t overwater your calla lilies, and put them far enough apart to allow for good air circulation between them to lower the chance of fungal illnesses.
Pests such as slugs, spider mites, and aphids are among the insects that can cause problems for calla lilies. To counteract these problems, treat the plants with horticultural oil such as neem oil or mild insecticidal soap.
Common Problems With Calla Lily
Growing calla lilies is generally simple. They don’t require much maintenance, save from regular watering. However, if their growing needs aren’t met, they can suffer.
Brown Edges of Leaves
A brown edge on your leaves could indicate that there is too much nitrogen in your fertilizer. A nitrogen-rich fertilizer may be the source of your plant’s brown-edged leaves, even though it grows quickly and appears lush. Most likely, your plant won’t flower either.
Yellowing Leaves, Wilting, or Stunted Growth
The calla lilies adore the water. They may not bloom, will appear stunted, and the leaves will look yellowed and wilted if they are not receiving enough water. Water your calla lilies regularly to promote healthy foliage and blooming; deficiency in sunshine can also hinder growth.
Drooping Stems and Flowers
Watering plants too little or too much can result in drooping plants. Additionally, drooping stems and blossoms might result from an excess of nitrogen in fertilizer. It will become more lively if you add water if it isn’t getting enough.
Also Read: Canna Lily Complete Guide To Grow And Care